4.2. Accessing Virtuozzo Storage Clusters via iSCSI
Virtuozzo Storage allows you to export cluster disk space outside Virtuozzo Storage bounds to operating systems and third-party virtualization solutions. Using dedicated vstorage-iscsi tools, you can export Virtuozzo Storage disk space as LUN block devices over iSCSI in a SAN-like manner.
In Virtuozzo Storage, you can create and run multiple iSCSI targets per Virtuozzo Storage cluster Node. In turn, each iSCSI target can have multiple LUNs (virtual disks). At any given moment, each iSCSI target runs on a single Hardware Node. Thanks to High Availability, if a Node fails, iSCSI targets hosted on it are moved to and relaunched on a healthy Node (for more details on High Availability, see Managing High Availability Clusters.
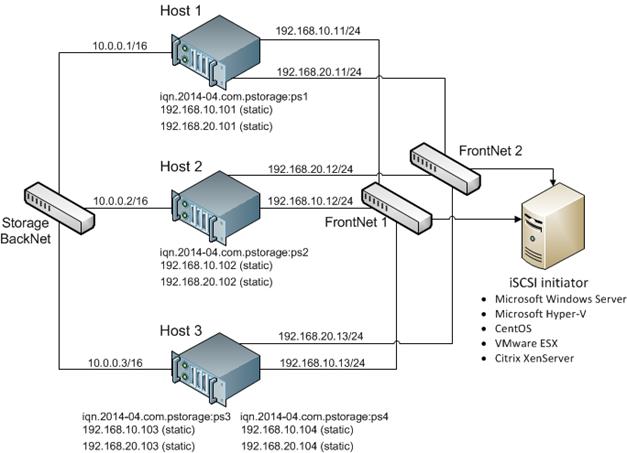
The figure below shows a typical network configured for exporting Virtuozzo Storage disk space over iSCSI.

In this example are three Virtuozzo Hardware Nodes working in a Virtuozzo Storage cluster. Two Nodes host one iSCSI target each while the third hosts two iSCSI targets. Each Node has a static or dynamic IP address assigned from the Storage BackNet (created along with the Virtuozzo Storage cluster) and the FrontNet. Each iSCSI target has a static IP address assigned from the FrontNet.
4.2.1. Preparing to Work with iSCSI Targets
On each Virtuozzo Hardware Node, where you need to create and run iSCSI targets, do the following:
Make sure the
vstorage-iscsiandpstorage-scsi-target-utilspackages are installed on the Hardware Node.Make sure that the Hardware Node has access to the Virtuozzo Storage cluster as client and has an entry in
/etc/fstab. For more information, see Setting Up Clients.Create a directory in the Virtuozzo Storage cluster where you will store iSCSI targets and their configuration. For example,
/vstorage/stor1/iscsi.Set the
ISCSI_ROOTvariable in/etc/vstorage/iscsi/configto the directory from the previous step. For example: ISCSI_ROOT=/vstorage/stor1/iscsiEnable High Availability support for the hardware node. See Enabling and Disabling High Availability for Nodes.
You are now ready to create and run iSCSI targets in your Virtuozzo Storage cluster.
4.2.2. Creating and Running iSCSI Targets
Prerequisites:
Each iSCSI target must be assigned at least one unique IP address from frontnet’s static pool.
The name of each iSCSI target must be unique in the Virtuozzo Storage cluster.
Virtuozzo Storage iSCSI targets support persistent reservations to allow iSCSI initiators obtain exclusive access to the specified target’s LUNs.
To create and start a target test1 with the size of 100 GB, the LUN of 1, and the IP address of 192.168.10.100, execute the following commands:
# vstorage-iscsi create -n test1 -a 192.168.10.100
IQN: iqn.2014-04.com.vstorage:test1
# vstorage-iscsi lun-add -t iqn.2014-04.com.vstorage:test1 -l 1 -s 100G
# vstorage-iscsi start -t iqn.2014-04.com.vstorage:test1
If you need to change target’s IP address, stop the target as described in Stopping iSCSI Targets, then run the command vstorage-iscsi set -t <target_name> -a <new_IP_address>.
If you need to increase the size of a LUN, stop the target as described in Stopping iSCSI Targets, then run the command vstorage-iscsi lun-grow -t <target_name> -l <lun_ID> -s <new_size>.
To check that the target is up, run the vstorage-iscsi list command with the target’s name as the option. For example:
# vstorage-iscsi list -t iqn.2014-04.com.vstorage:test1
Target iqn.2014-04.com.vstorage:test1:
 Portals:     192.168.10.100
 Status:      running
 Registered:  yes
 Host:        fefacc38a2f140ca
 LUN:   1, Size:  102400M, Used:     1M, Online: Yes
For information about the command output, see Listing iSCSI Targets.
iSCSI initiators can now access the target iqn.2014-04.com.vstorage:test1 via the portal 192.168.10.100.
Performance Tips
Spread iSCSI targets evenly across Hardware Nodes in the cluster. For example, 10 Hardware Nodes with 1 iSCSI target per each will perform better than a single Hardware Node with 10 iSCSI targets on it.
More LUNs per fewer iSCSI targets will perform better than fewer LUNs per more iSCSI targets.
4.2.3. Listing iSCSI Targets
Using the vstorage-iscsi list command, you can list all iSCSI targets registered on a Virtuozzo Storage Node or display detailed information about a specific iSCSI target on a Virtuozzo Storage Node.
To list all iSCSI targets registered on a Virtuozzo Storage Node, run the command as follows:
# vstorage-iscsi list
IQN                             STATUS  LUNs HOST             PORTAL(s)
iqn.2014-04.com.vstorage:test1  running 1    fefacc38a2f140ca 192.168.10.100
iqn.2014-04.com.vstorage:test2  running 1    fefacc38a2f140ca 192.168.10.101
iqn.2014-04.com.vstorage:test3  stopped 1    fefacc38a2f140ca 192.168.10.102
iqn.2014-04.com.vstorage:test4  stopped 0    fefacc38a2f140ca 192.168.10.103
To display detailed information about an iSCSI target registered on a Virtuozzo Storage Node, run the vstorage-iscsi list command with the target’s name as the option. For example:
# vstorage-iscsi list -t iqn.2014-04.com.vstorage:test1
Target iqn.2014-04.com.vstorage:test1:
 Portals:     192.168.10.100
 Status:      running
 Registered:  yes
 Host:        fefacc38a2f140ca
 LUN:   1, Size:  102400M, Used:     1M, Online: Yes
The command outputs above show the following data:
Item |
Description |
|---|---|
Target |
Unique alphanumeric name of the iSCSI target. |
Portals |
Target’s IP address(es). |
Status |
Target’s current state.
|
Registered |
Whether or not the target is registered on the host which ID is shown in the Host entry. |
Host |
Virtuozzo Storage hardware node ID. |
LUN |
Virtual disk’s integer number within the target. |
Size |
Virtual disk’s logical size (16 TB maximum). |
Used |
Virtual disk’s physical size. The physical size can be smaller than logical due to the expanding format of the virtual disk (for more information, see Virtual Hard Disks). |
Online |
|
4.2.4. Transferring iSCSI Targets Between Nodes
You can transfer stopped iSCSI targets between Virtuozzo Storage nodes. After the transfer, you will be able to start and manage the iSCSI target on the destination Node. On the source Node, you will only be able to delete the transferred target with the --force option (for more details, see Deleting iSCSI Targets).
To transfer an iSCSI target, do the following:
Make sure the target is stopped. For more details, see Stopping iSCSI Targets.
Unregister the target on its current Node with the
vstorage-iscsi unregistercommand. For example:# vstorage-iscsi unregister -t iqn.2014-04.com.vstorage:test1
Register the target on the new Node with the
vstorage-iscsi registercommand. For example:# vstorage-iscsi register -t iqn.2014-04.com.vstorage:test1
4.2.5. Stopping iSCSI Targets
To stop a Virtuozzo Storage iSCSI target to which no initiators are connected, use the vstorage-iscsi stop command. For example, for the target iqn.2014-04.com.vstorage:test1:
# vstorage-iscsi stop -t iqn.2014-04.com.vstorage:test1
If one or more iSCSI initiators are still connected to the target, you will be informed as follows:
# vstorage-iscsi stop -t iqn.2014-04.com.vstorage:test1
initiators still connected
Initiator:   iqn.1994-05.com.redhat:c678b9f6f0 (192.168.30.100)
Unable stop target iqn.2014-04.com.vstorage:test1
In this case, disconnect the iSCSI initiator according to the product manual and run the vstorage-iscsi stop command again.
To forcibly stop a target to which one or more initiators are still connected, add the -f option to the command above. For example:
# vstorage-iscsi stop -t iqn.2014-04.com.vstorage:test1 -f
Breaking the iSCSI connection in such a way may result in I/O errors on the iSCSI initiator’s side.
4.2.6. Deleting iSCSI Targets
You can delete Virtuozzo Storage iSCSI targets with the vstorage-iscsi delete command. Deleting a Virtuozzo Storage iSCSI target, you will also delete all the LUNs within it.
To delete a Virtuozzo Storage iSCSI target, do the following:
Make sure the target is stopped (for more details, see Stopping iSCSI Targets).
Run the
vstorage-iscsi deletecommand with the target name as the option. For example:# vstorage-iscsi delete -t iqn.2014-04.com.vstorage:test1
To delete a stopped iSCSI target registered on a different host, add the --force option to the vstorage-iscsi delete command. For example:
# vstorage-iscsi delete -t iqn.2014-04.com.vstorage:test1 --force
4.2.7. Accessing iSCSI Targets from Operating Systems and Third-Party Virtualization Solutions
This section describes ways to attach Virtuozzo Storage iSCSI targets to a number of operating systems and third-party virtualization solutions.
4.2.7.1. Accessing iSCSI Targets from CentOS 6.5
Make sure that the
iscsi-initiator-utilspackage is installed.Discover the required target by its IP address. For example:
# iscsiadm --mode discovery --type sendtargets --portal 192.168.10.100
Restart the
iscsidservice to rescan for newly added drives:# service iscsi restart
To check that the new drive has appeared in the system, use fdisk, parted or similar tools.
For more information, see the Red Hat Enterprise Linux Storage Administration Guide.
4.2.7.2. Accessing iSCSI Targets from Microsoft Windows Server 2012 R2
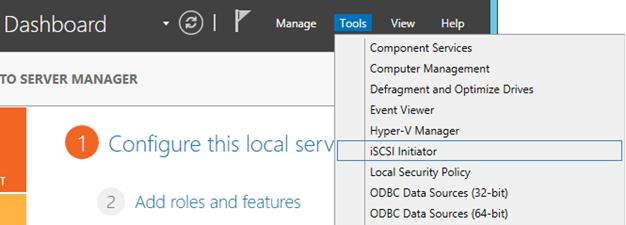
In the Server Manager Dashboard, click the Tools menu in the toolbar and select iSCSI Initiator.
In the iSCSI Initiator Properties, switch to the Discovery tab and click Discover Portal….

In the Discover Target Portal window, enter the portal IP address and click OK.

The newly added portal will appear in the Target portals section.
On the iSCSI Initiator Properties > Targets tab, select the new target in the Discovered targets section and click Connect.

In the Connect to Target window, click OK.

Target’s Inactive status will change to Connected.

The newly attached disk will appear in Server Manager Dashboard > Computer Management > Storage > Disk Management.

Right-click the disk information section and select Online.

The disk status will change to Online.
Right-click the disk information section and select Initialize Disk.

In the Initialize Disk window, click OK.

Right-click the disk space section, select New Simple Volume…, and follow the wizard’s instruction to format the new disk to NTFS.

The disk state will change to Healthy.

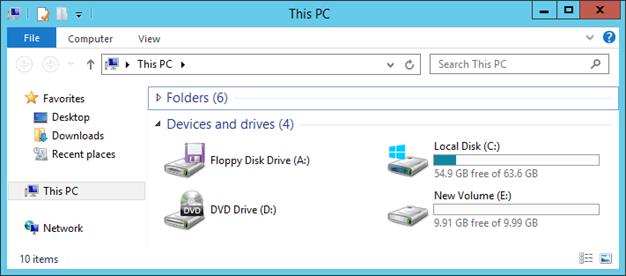
The new disk will appear in Windows Explorer.
4.2.7.3. Accessing iSCSI Targets from VMware ESXi
In the vSphere Client, switch to the Configuration tab, and click Storage Adapters in the Hardware section.
If no software iSCSI adapters have been added, do so by right-clicking in the Storage Adapters section and selecting Add Software iSCSI Adapter….
Open the software iSCSI adapter’s properties, switch to the Static Discovery tab and click Add….
In the Add Static Target Server window, enter the target’s IP address and name.
Close the software iSCSI adapter’s properties window and rescan the adapter as prompted.
The newly added iSCSI target will appear in the Details section of the software iSCSI adapter you have configured.
For more information, see the VMware vSphere Storage Guide.
4.2.7.4. Accessing iSCSI Targets from Citrix XenServer 6.2
In XenCenter, switch to the Storage tab and click New SR….
In the New Storage Repository window:
In the Type section, select the Software iSCSI option,
In the Name section, provide a name or leave the default,
In the Location section, enter target’s IP address in the Target Host field, click Discover IQNs and select the desired target, then click Discover LUNs and select the desired LUN.
Click Finish to format the disk.
The new storage repository will appear in XenCenter.
For more information, see the XenCenter documentation.
4.2.7.5. Accessing iSCSI Targets from Microsoft Hyper-V
Note
Names of the targets to be mounted must not contain underscore characters.
Make sure that Microsoft iSCSI Initiator Service,
MSiSCSI, is running.Discover a new target portal. For example, for the portal 192.168.10.100, run:
PS C:\Users\Administrator>new-iscsitargetportal -targetportaladdress 192.168.10.100
Initiator Instance Name  :
Initiator Portal Address :
IsDataDigest             : False
IsHeaderDigest           : False
TargetPortalAddress      : 192.168.10.100
TargetPortalPortNumber   : 3260
PSComputerName           :
Connect to the desired target. For example, for the target iqn.2014-03.com.vstorage:test1
PS C:\Users\Administrator> connect-iscsitarget
cmdlet Connect-IscsiTarget at command pipeline position 1
Supply values for the following parameters:
NodeAddress: iqn.2014-04.com.vstorage:test1
AuthenticationType      : NONE
InitiatorInstanceName   : ROOT\ISCSIPRT\0000_0
InitiatorNodeAddress    : iqn.1991-05.com.microsoft:win-l2dj7g36n7e.sw.swsoft.com
InitiatorPortalAddress  : 0.0.0.0
InitiatorSideIdentifier : 400001370000
IsConnected             : True
IsDataDigest            : False
IsDiscovered            : True
IsHeaderDigest          : False
IsPersistent            : False
NumberOfConnections     : 1
SessionIdentifier       : ffffe00000b5e020-4000013700000005
TargetNodeAddress       : iqn.2014-04.com.vstorage:test1
TargetSideIdentifier    : 0001
PSComputerName          :
To check that the disk has been connected, run
PS C:\Users\Administrator> get-disk
Number Friendly Name                     OperationalStatus Total Size Partition Style
------ -------------                     ----------------- ---------- ---------------
1      IET VIRTUAL-DISK SCSI Disk Device Offline           100 GB RAW
<...>
You can now initialise the newly mounted disk for use in Microsoft Hyper-V.
For more information, see iSCSI Cmdlets in Windows PowerShell.
4.2.8. Configuring Multipath I/O for iSCSI Targets
Multipath I/O is a technique called to increase fault tolerance and performance by establishing multiple paths to the same iSCSI target. The figure below shows a typical multipath-enabled network configured for exporting Virtuozzo Storage disk space over iSCSI.
In this example are three Virtuozzo Hardware Nodes working in a Virtuozzo Storage cluster. Two Nodes host one iSCSI target each while the third hosts two iSCSI targets. Each Hardware Node is assigned a static or dynamic IP address from the FrontNet 1 and the same from the FrontNet 2. In turn, each iSCSI target is assigned a static IP address from the FrontNet 1 and a static IP address from the FrontNet 2. In case one of the frontnets fails, the iSCSI targets will still be accessible via the other one.
To enable multipath I/O for a Virtuozzo Storage iSCSI target, assign to it multiple IP addresses from different networks using the -a option. For example, for a Node connected to two networks, 192.168.10.0/24 and 192.168.20.0/24, run the following command:
# vstorage-iscsi create -n ps1 -a 192.168.10.101 -a 192.168.20.101
4.2.9. Managing CHAP Accounts for iSCSI Targets
Virtuozzo Storage allows you to restrict access to iSCSI targets by means of CHAP authentication.
To make use of CHAP authentication, you need to:
Create a CHAP account.
Create an iSCSI target bound to this CHAP account.
These actions are described in detail in the following subsections.
4.2.9.1. Creating CHAP Accounts for iSCSI Targets
To create a CHAP account, use the vstorage-iscsi account-create command. For example, to create the CHAP account user1:
# vstorage-iscsi account-create -u user1
Enter password:
Verify password:
4.2.9.2. Creating iSCSI Targets Bound to CHAP Accounts
To create a Virtuozzo Storage iSCSI target bound to a CHAP account, use the vstorage-iscsi create command with the additional -u option. For example, create a target bound to the CHAP account user1:
# vstorage-iscsi create -n test1 -a 192.168.10.100 -u user1
IQN: iqn.2014-04.com.vstorage:test1
4.2.9.3. Changing the CHAP Account Password
To change the password of a CHAP account, use the vstorage-iscsi account-set command. For example, to change the password of the CHAP account user1:
# vstorage-iscsi account-set -u user1
Enter password:
Verify password:
The new password will become active after target reboot.
4.2.9.4. Listing CHAP Accounts and iSCSI Targets Assigned to Them
To list existing CHAP accounts, use the vstorage-iscsi account-list command. For example:
# vstorage-iscsi account-list
user1
To list Virtuozzo Storage iSCSI targets assigned to a specific CHAP account, use the vstorage-iscsi account-list command with the -u option. For example, to list iSCSI targets assigned to the CHAP account user1:
# vstorage-iscsi account-list -u user1
iqn.2014-04.com.vstorage:test1
4.2.10. Managing LUN Snapshots
As with virtual machines, you can create and manage snapshots of LUNs. At that, to create a snapshot of the entire target, you will need to create snapshots of each LUN within it.
4.2.10.1. Creating LUN Snapshots
To create a snapshot of a LUN in an iSCSI target, use the vstorage-iscsi snapshot-create command. For example, for LUN 1 on target iqn.2014-04.com.vstorage:test1:
# vstorage-iscsi snapshot-create -t iqn.2014-04.com.vstorage:test1 -l 1
Snapshot a1f54314-bc06-40c6-a587-965feb9d85bb successfully created.
Note
To generate a UUID manually, use uuidgen.
4.2.10.2. Listing LUN Snapshots
To list snapshots for the specified LUN, use the vstorage-iscsi snapshot-list command. For example, for LUN 1 on target iqn.2014-04.com.vstorage:test1:
# vstorage-iscsi snapshot-list -t iqn.2014-04.com.vstorage:stor4 -l 1
CREATED             C UUID                                 PARENT_UUID
2014-04-11 13:16:51   a1f54314-bc06-40c6-a587-{...} 00000000-0000-0000-{...}
2014-04-11 13:16:57 * 9c98b442-7482-4fd0-9c45-{...} a1f54314-bc06-40c6-{...}
In the output above, the asterisk in the column C indicates the current snapshot, while the column PARENT_UUID shows snapshot dependency or history.
4.2.10.3. Switching Between LUN Snapshots
To switch to the specified LUN snapshot, use the vstorage-iscsi snapshot-switch command. For example:
# vstorage-iscsi snapshot-switch -u a1f54314-bc06-40c6-a587-965feb9d85bb
After you switch to a snapshot, the current LUN image will be removed.
Note
You can only switch between snapshots, if the LUN is offline.
4.2.10.4. Viewing LUN Snapshot Information
To view information about the specified snapshot, use the vstorage-iscsi snapshot-info command. For example:
# vstorage-iscsi snapshot-info -u 9c98b442-7482-4fd0-9c45-9259374ca84e
Target: iqn.2014-04.com.vstorage:stor4
LUN: 1
Created: 2014-04-11 13:16:57
Parent: 00000000-0000-0000-0000-000000000000}
{a1f54314-bc06-40c6-a587-965feb9d85bb}
{9c98b442-7482-4fd0-9c45-9259374ca84e
Description: None
4.2.10.5. Deleting LUN Snapshots
To delete the specifed LUN snapshot, use the vstorage-iscsi snapshot-delete command. For example:
# vstorage-iscsi snapshot-delete -u a1f54314-bc06-40c6-a587-965feb9d85bb
If the snapshot has no any children, it will be deleted. If the snapshot has a single child, it will be merged to that child.
Note the following:
You can only delete offline snapshots.
Deleting a snapshot that has multiple children is currently not supported.